In the parkour world, to vault an obstacle means that you jump over something using one or two hands for brief upper body support. Think of how you might quickly hop over a low gate. You might let a foot touch down, but in general both feet clear the obstacle without contact.
From beginner moves like the step and lazy vaults, to the more advanced kong and dash vaults, there are many variations. The commonality is that vaulting takes confidence, coordination, and a basic foundation of bodyweight strength. In this post, you will learn two static holds to help build the whole body strength for better vaulting.
Why are static holds important?
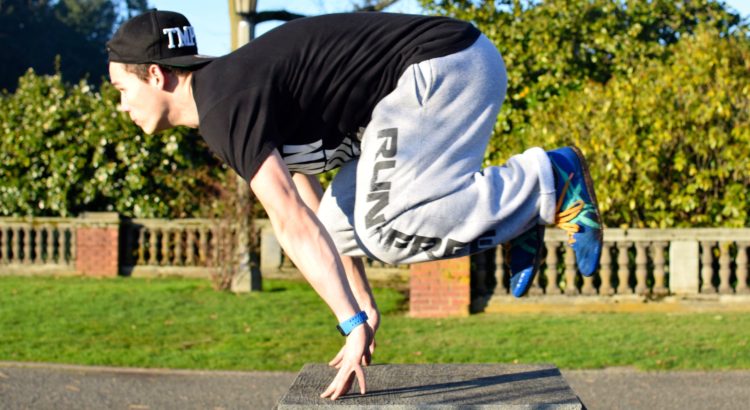
If vaulting is a dynamic movement, why should you bother with training static positions? That’s a good question, and the answer involves two parts. Before providing the answer, I want you to take a look at the two images below.


The first picture is of a kong vault. The second picture shows a dash vault. Notice how Nathan’s body appears in each image. His arms are engaged, pre and post impact. Likewise, his trunk is compressed into two distinct shapes. In the kong vault, he is balled up in a tuck position. In the dash vault, his legs are extended into an “L” position.
That brings us to why training static holds is important for parkour vaults. Here we go.
-
Static holds build the strength for the transitional, arm-loaded phase of a vault.
-
Static holds build familiarity with the body shapes essential for vaulting.
With that in mind, can you to take stab at which static positions are most relevant to this article? Remember your arms support you, and we want to demonstrate both a tuck and an L shape.
Any guesses?
The two positions I’m talking about of course are the tuck planche and the L-sit.
Let’s go over how to train the tuck planche first.
Training tips for the tuck planche
Before trying this exercise, know that your wrists need a fair amount of conditioning to tolerate the range of motion. Thus, it is a smart idea to begin your training with your hands in a neutral position, such as on a set of parallettes or full parallel bars. If you have a set of ground rail trainers, you can use those too.

Another option is to try it with your fingers curled over the edge of an obstacle. A park bench or set of bleachers will work great. Doing the holds with your palms flat and fingers extended requires a high degree of wrist flexibility. Letting your fingers flex takes some of the pressure off. In the picture above, I only show it on top of an obstacle as a comparison to the actual kong vault.
So, how do you work up to a tuck planche?
One of the easiest ways to build strength and familiarity with the skill is to first train a frog stand. If you’ve ever done yoga, you may also know the position as the crow pose. The idea is to balance on your hands, with your knees resting on the meaty part of your arm above your elbow.
Get on the ground in a low crouch. Put your hands in front of you, with your fingers pointed forward. Being slightly externally rotated is okay too. Shift your weight into your palms, and then gently place one knee at a time above each elbow. See if you can stay perched in this position for at least five seconds.
After you are confident balancing in a frog stand, the next step is to take your knees off your elbows. Sucking your knees under your body requires much more compressive, abdominal strength than having them rest on your arms. Those of you new to this type of bodyweight training may need to find a few ways to scale into the unsupported position.
Letting your feet rest on small block behind you is a one method for a bit of support. From there, see if you can obtain the position with only one foot touching down. After enough training you’ll be able to lift your feet completely off the block. Stay active through your trunk, sucking your knees into your chest as tight as possible.
A few other cues are that you are aiming for straight arms and a flat back. A common error is to balance on bent arms, with your elbows flared outward. Try to push the ground with as much power as you can, while aiming your elbows directly behind you. In terms of achieving a flat back, have someone spot you or take a video to assess your alignment.
Make it your goal to hold a solid 10-second tuck planche. That is plenty strong for the parkour purposes. Although gymnasts and other athletes may work toward more advanced variations, it’s not needed for vaulting.
Training tips for the L-sit
Like the tuck planche, a solid L-sit requires a high amount of upper body strength and flexibility, especially at the wrists. Starting off on a set of parallel bars or the edge of an obstacle can be useful before doing it on flat ground. The other benefit of beginning from an elevated position is that it allows your legs to dangle below horizontal. Holding your legs off the floor and parallel with the ground, takes significant hip, core, and shoulder strength.

Now, scaling into a respectable L-sit is a different process than the tuck planche. The idea is to incrementally increase the amount of weight extended in front of you.
Begin by placing your hands on the floor next to your hips, with your fingers pointed forward, and perhaps slightly outward. Remember, you can start by using parallettes or ground rail trainers to deload your wrists. Stack your hands as close beneath your shoulders as possible. The farther out to the side they are, the more challenging the movement will be.
Before extending your legs into the L position, you first need to master a tuck sit. That means you need to pull both knees to your chest, while lifting your butt off the ground. Notice how this position demands two simultaneous actions. You are actively pushing the ground through your arms, while also curling your legs into a tight ball. Again, aim to completely straighten your arms and pull your elbows in to your ribs.
Once you can hold a tuck sit with some confidence, begin uncurling into a more open shape. Try extending one leg. See if you can hold it out there while the other knee stays tucked to your chest. From there, work your way to extending both legs into the full L position.
An important cue is that you should be actively shoving your hands behind you. Simply pushing down into the floor isn’t enough. Thrusting your hands backward into the ground—or the bars—helps lift your legs to horizontal. Without that strong posterior shoulder drive, you will have a hard time keeping your feet off the floor.
Aim for a goal of 10 seconds. As I mentioned with the planche, there are more advanced progressions that you can work toward, but they aren’t essential for parkour. A high-quality 10-second L-sit will do magic for your vaulting game.
In summary
Movement mastery takes effort and patience. Building confidence with parkour vaults is no different. In your pursuit of better performance, be open to incorporating different strategies into your training. See what it’s like to start using tuck planches and L-sits to improve your vaulting.
For those of you who want a deeper look into the exercises that can help you excel at obstacle-based movement, pick up a copy of Parkour Strength Training. The book is a laden with resources to help you dominate vaults, climb-ups, and other parkour essentials.